Instagram Reels- Top 5 Questions Answered

Guess what any social media manager or content creator would say if you asked them today, for the key to growing your Instagram?
You guessed it right! Instagram Reels.
Creating and posting reels on Instagram is the secret sauce to increase your reach and engagement massively. If your social media and content strategy doesn't have reels in it, you are missing something very important.
For one of our pizza franchise clients, we at mKonnekt started making and posting reels four times per week, and one of the restaurants witnessed an of increase of 1100% in IG reach and 1300% increase in engagement. Therefore, we will wish to preach what we do!
Now, many people who want to boost their Instagram handle as novices find it quite challenging. Small business owners, personal brands, and everyone else may have difficulty developing an Instagram content strategy. Because, trust us, growing Instagram is no stroll in the park.
We are here to save the day. We have come up with what you might refer to as a comprehensive guide or solutions to the top and most often asked questions about Instagram reels.
Without further ado, let's go!
Table Of Contents
Q.1 What are Instagram reels?
Q.2 How to make and post an Instagram reel?
Q.3 What are some tips to make my reel viral?
Q.4 What is the best time to post an Instagram reel?
Q.5 How to track the top most important metrics?
What Are Instagram Reels?
Reels are brief, video-style pieces of content that may be produced to engage with your audience, grab their attention while educating them about your company story, and also be used to draw in potential customers.
You can leverage reels to make entertaining videos to share on Instagram with your 15-second multi-clip films can be recorded and edited using new artistic tools, audio, and effects. Reels can be shared on Feed with your followers, and if your account is public, a new section under Explore will allow users from all around Instagram to access them.
This wonderful video feature is accessible in the US and 50 other nations.
On August 5, 2020, Instagram unveiled this fantastic feature. You can read the official announcement here.
Instagram Reels have been a fantastic tool for brands and companies to exercise their creative muscles and provide a visual experience beyond a grid post ever since they were first introduced.
How To Make And Post An Instagram Reel?
Step 1-
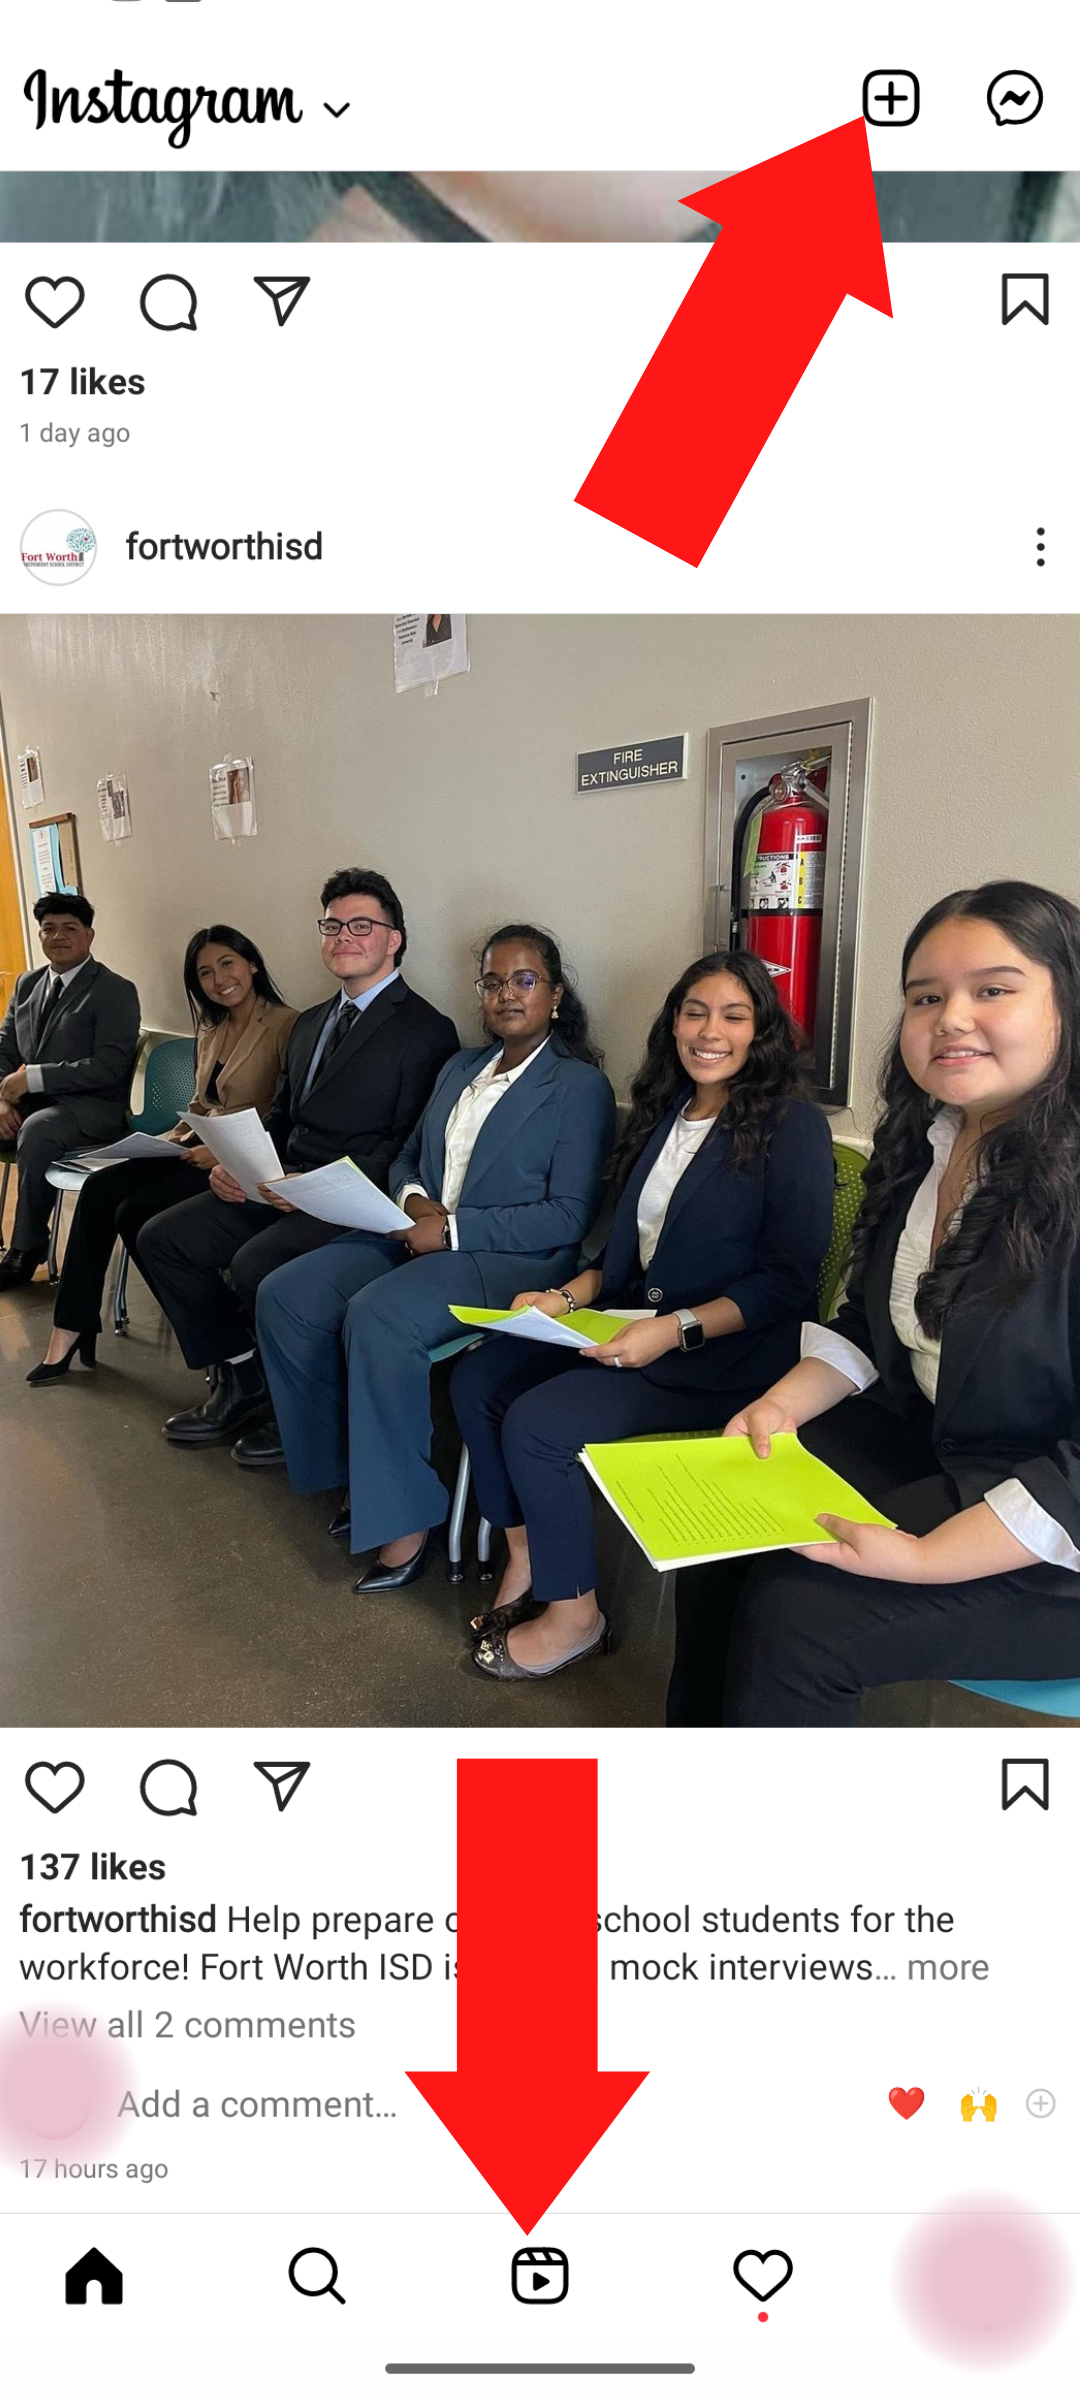
Open your IG profile’s homepage or what we also call as feed, and navigate to the top right hand corner. You will find a “plus” icon, beside the messages/DMs’ button.
Another option is to click on the “Reels” icon, situated in the middle of the five buttons at the very end of the page. Both options will take you to the same interface.
Step 2-
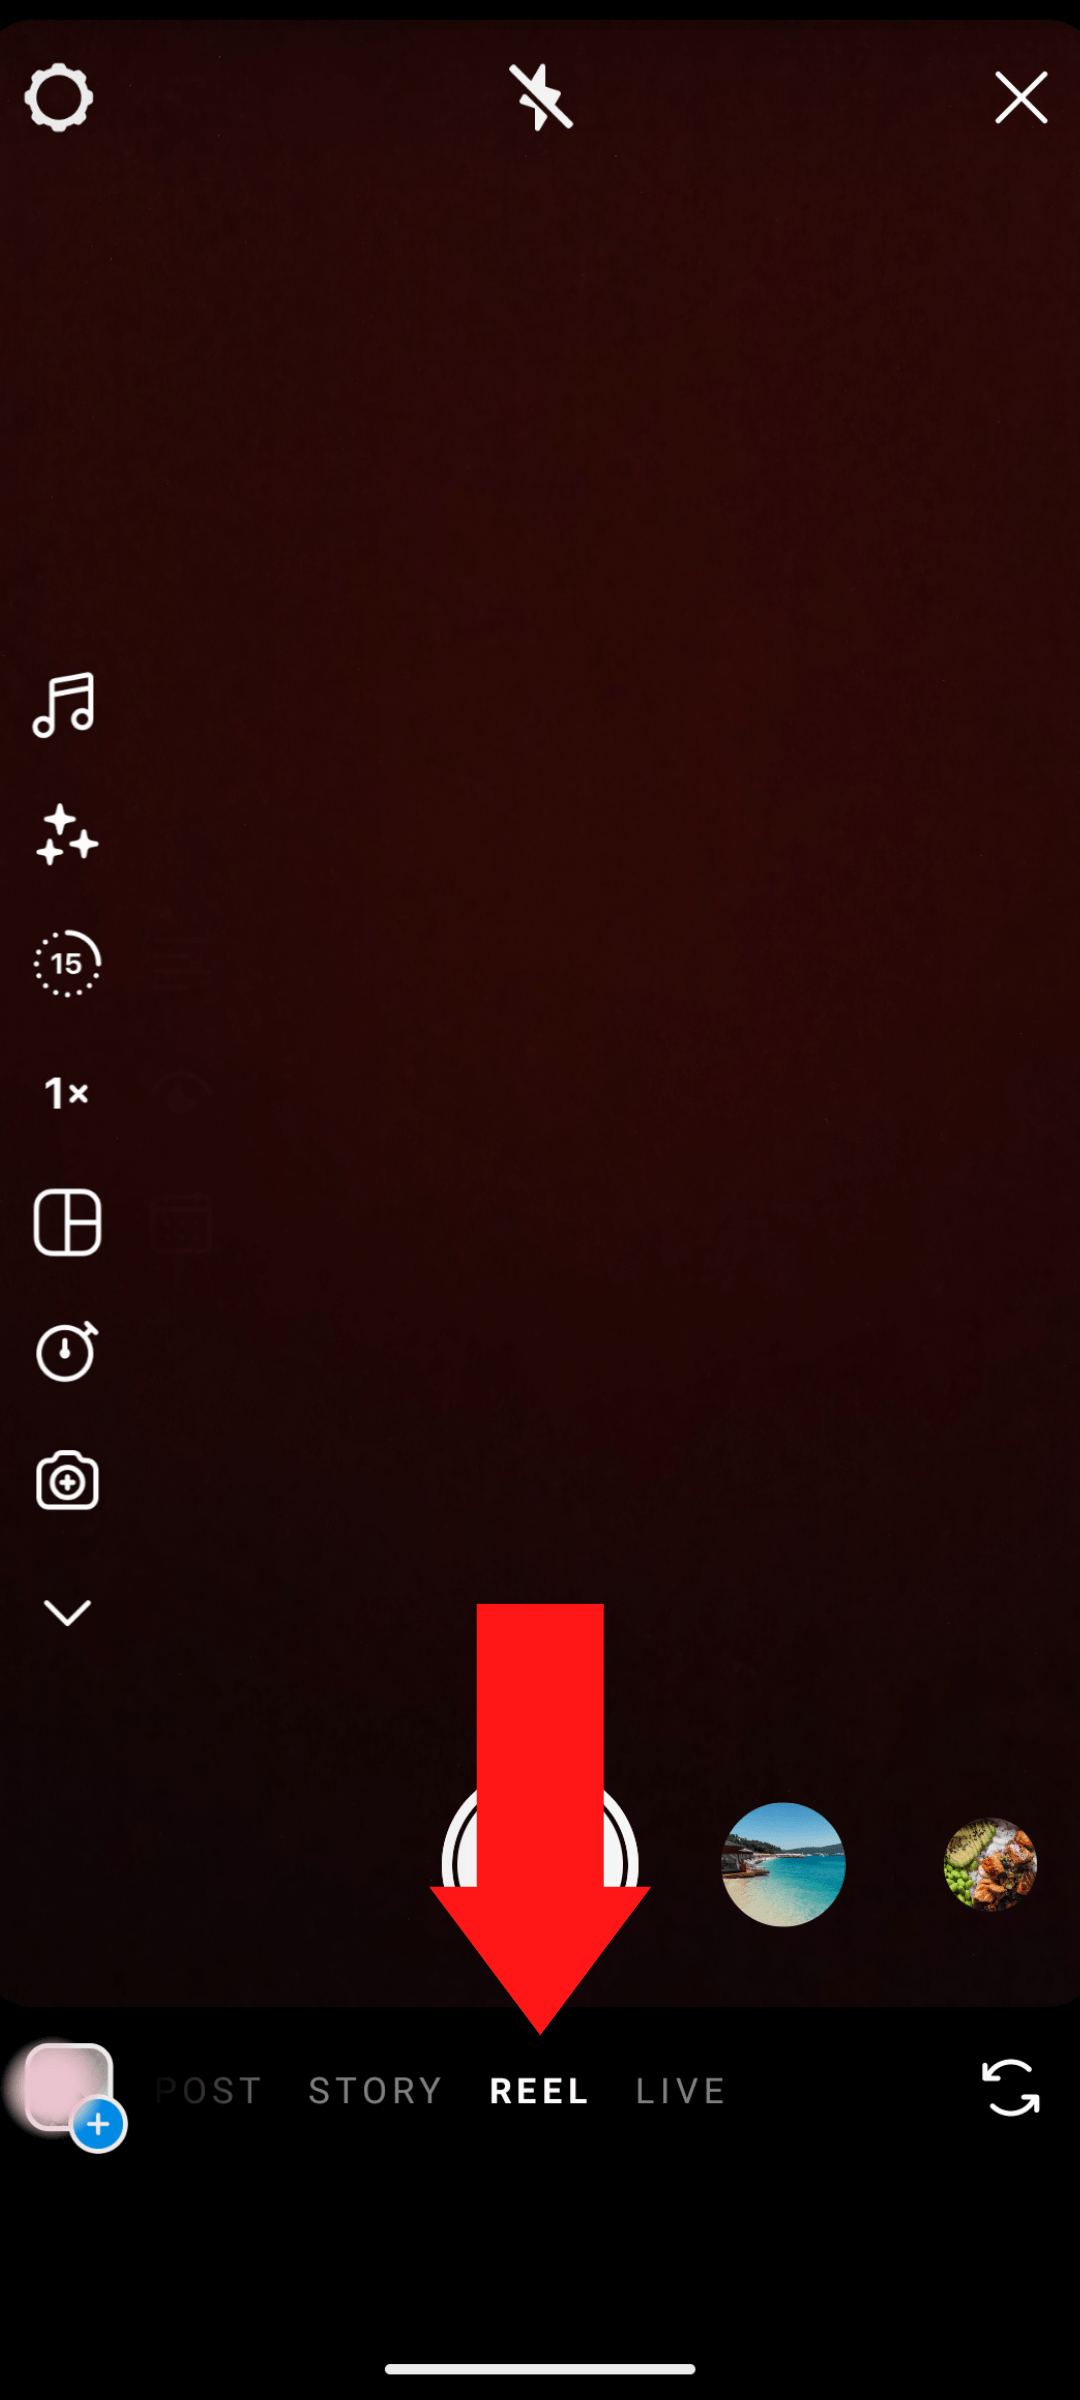
Next step is to select the “Reel” option out of the four options, “Post,” “Story”, “Reel” and “Live”. This is the third option out of the four.
Step 3-
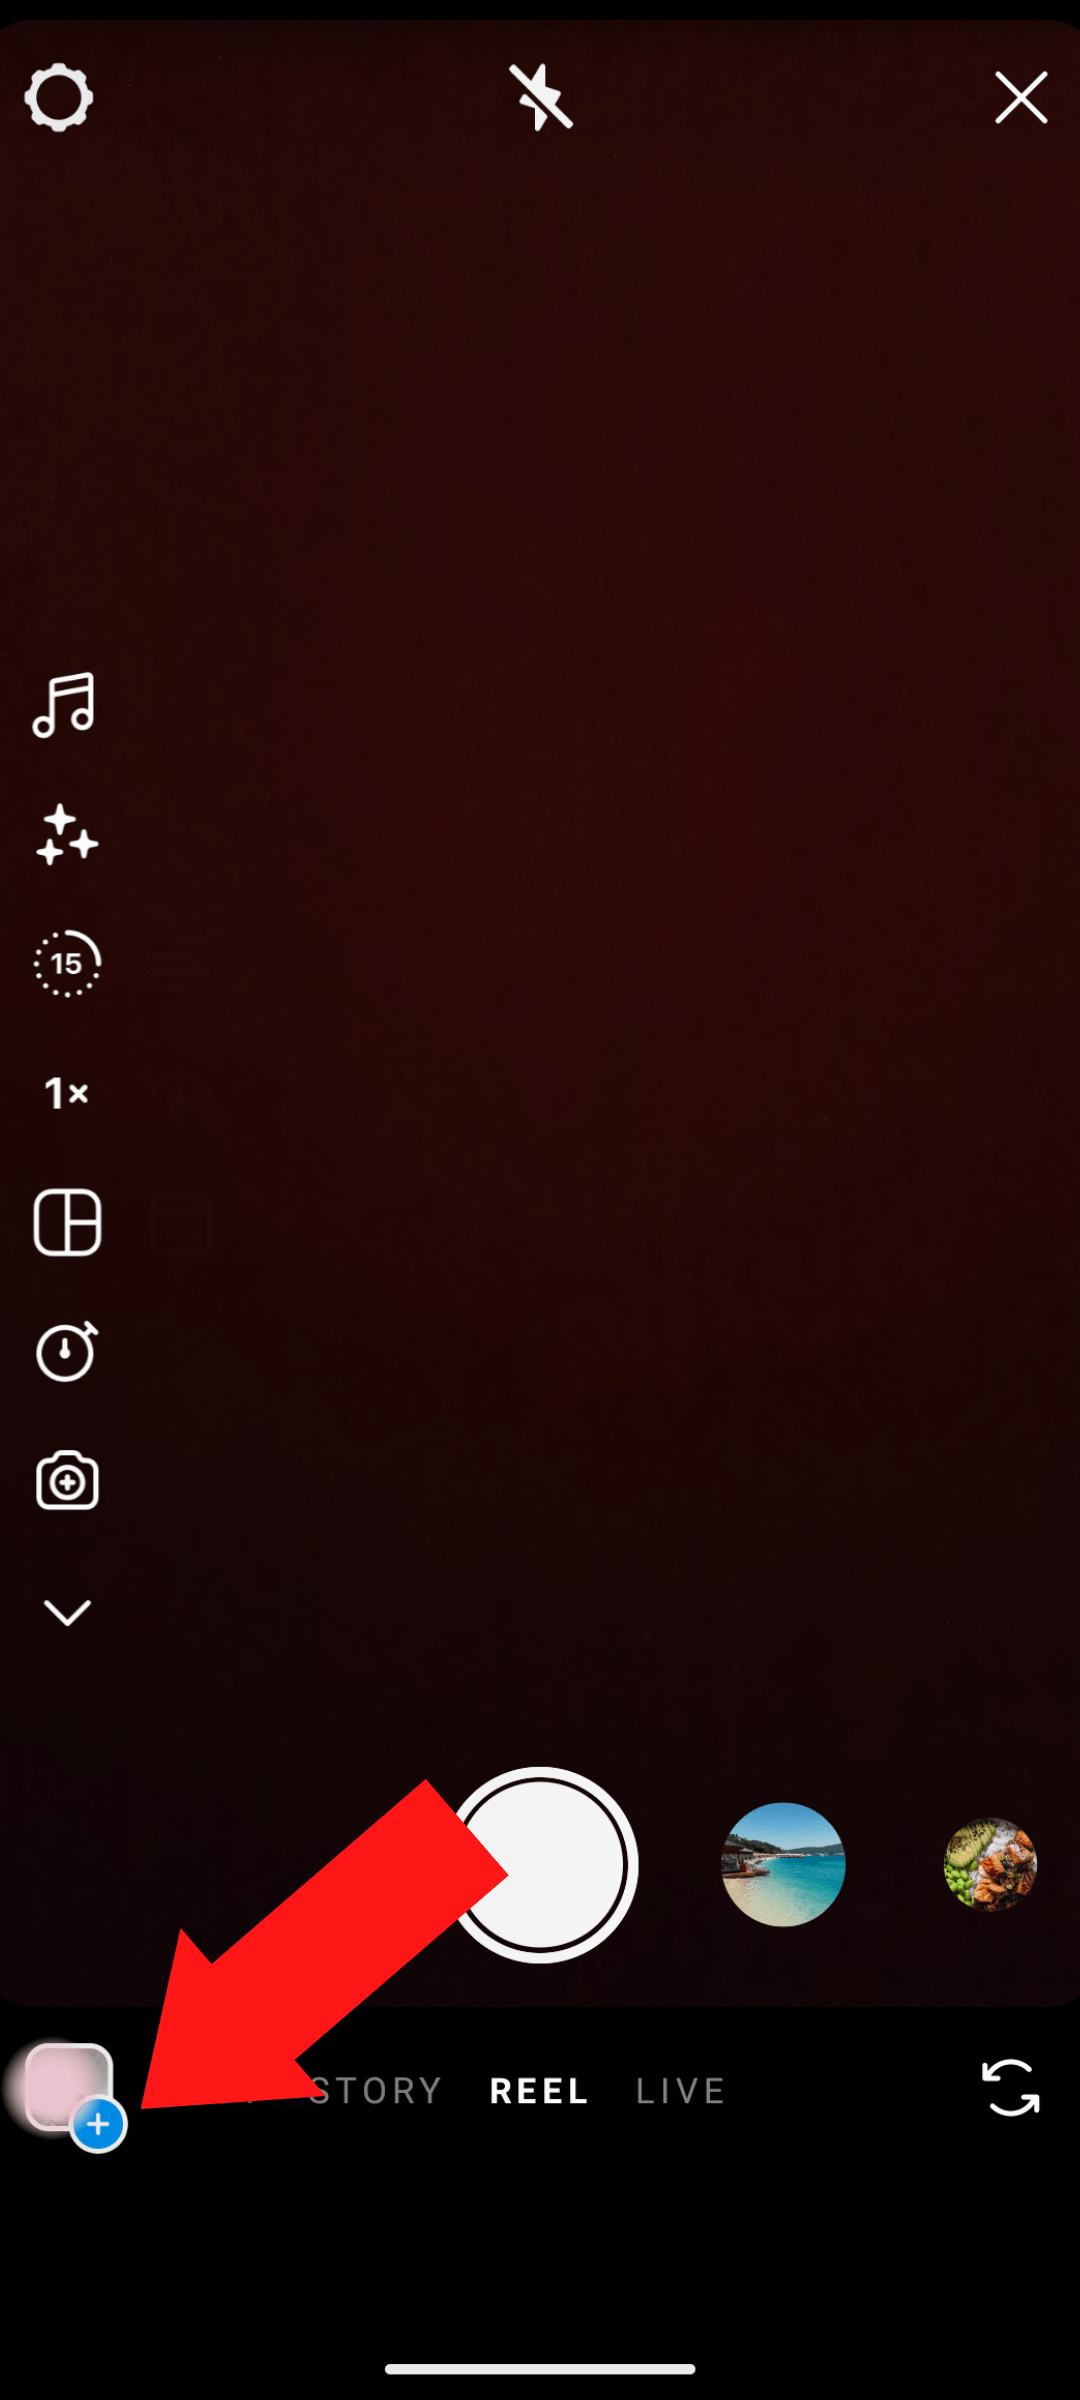
Now is the time to create your reel. If you have a pre-recorded video that you want to upload, click on the “plus” icon at the bottom left corner.
You can also use multiple pictures from your to create a reel by selecting them one by one from your device.
To create a reel, tap on the circular button at the bottom in the center of the interface, and hold until you are done. You can also preview to check how you did.
You can add stickers, download reels, write something on it etc. at this stage.
Step 4-
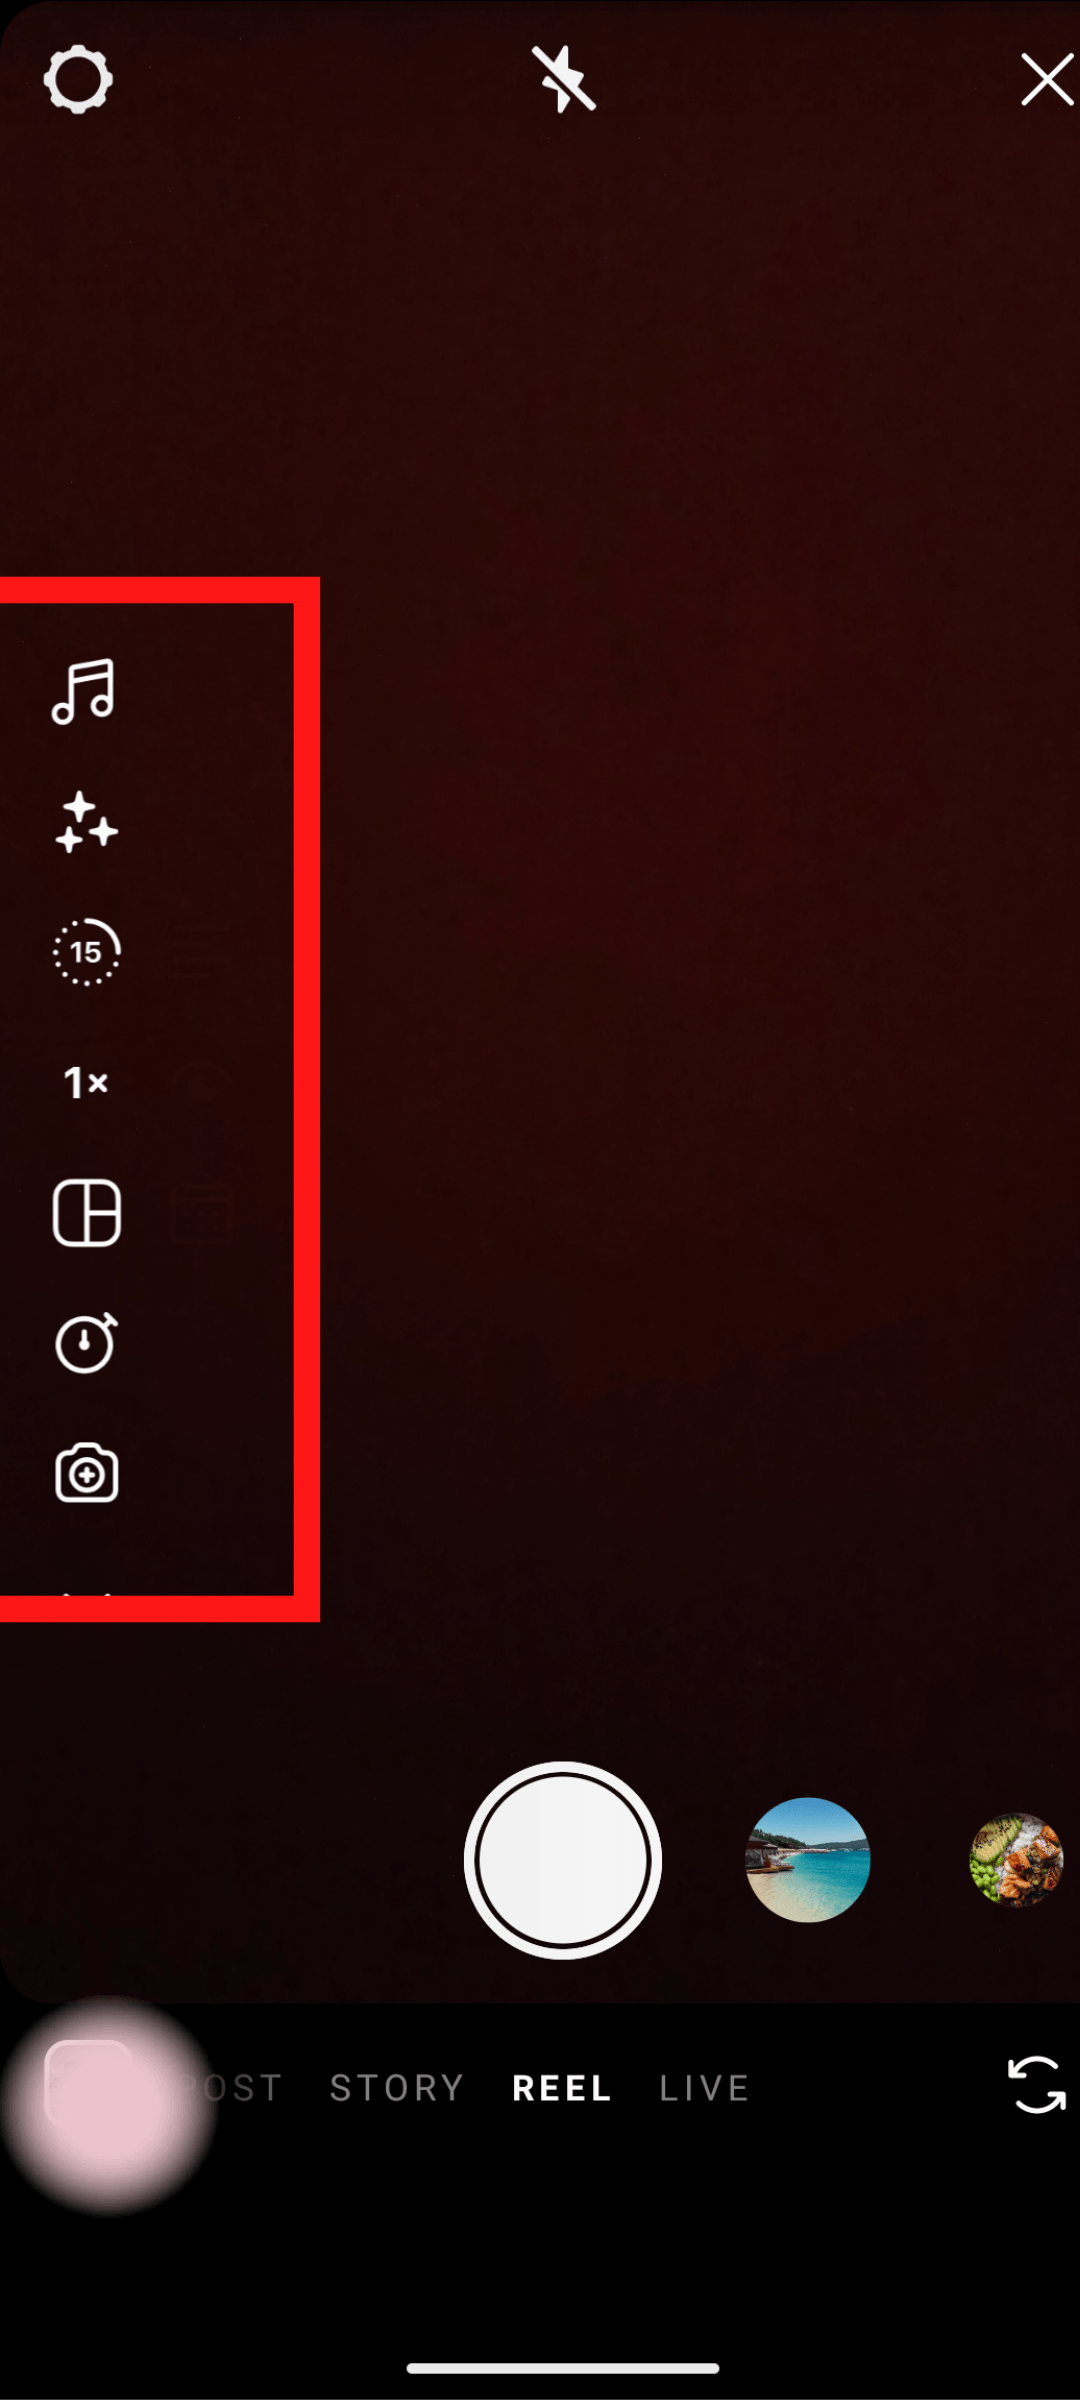
You can now edit your video with the reels editor which is the very interface that Instagram takes you to. There are multiple things that you can do with your video, let’s touch each of the options given here-
Audio-
Allows you to add audio to your video by choosing it from the Instagram music library or by importing it from your device. You can even decide to only include your preferred portion.
Effects-
Allows you to apply different effects like Hollywood cinematic, BlueSky etc. You may choose from trending, reels, and appearance options.
Length-
Allows you to adjust the video's length. Your video can be 15, 30, 60, or 90 seconds long.
Speed-
Allows you to adjust the video's speed. Choose to slow it down. 3x or . 5x, or accelerate it by selecting 2x, 3x etc.
Video Layout-
Allows you to change the layout and include multiple recordings in the frame.
Timer-
Allows you to specify a time limit for the following clip as well as a timer that will sound before you begin recording. If you want to record hands-free, this is helpful.
Dual (newly added feature)-
Allows you to simultaneously capture videos with your front and back cameras.
Gesture control-
Allows you to set the recording of the reel such that Instagram identifies a particular gesture before starting the recording. For example, Raising your hand to start the recording.
Step 5-
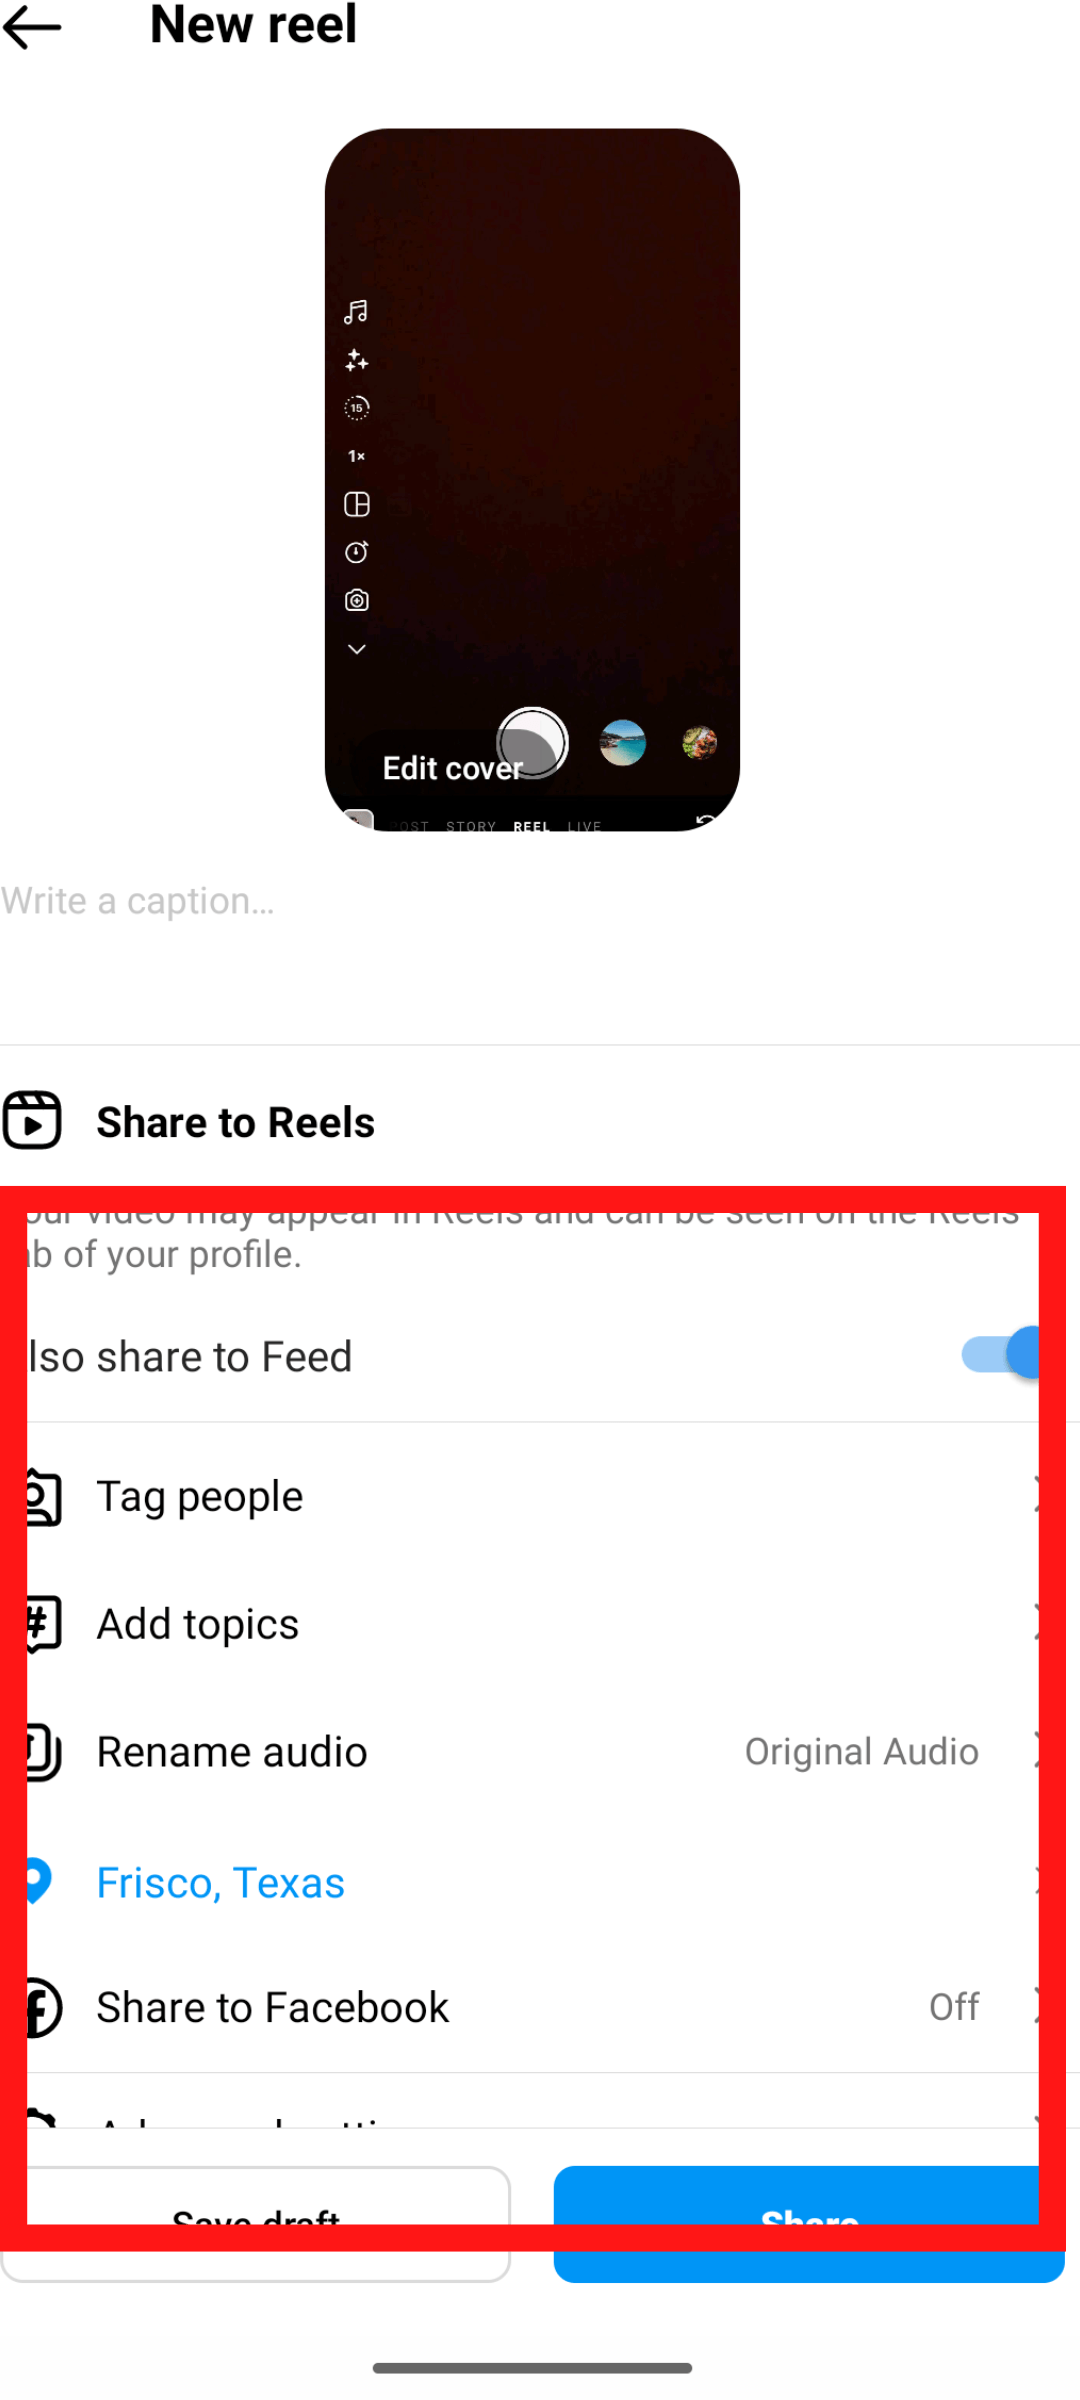
Now, you can make the edits that you would want to do before the reel going live. This includes changing the reel cover, adding a suitable caption, tagging people, adding location etc. This interface is pretty user friendly and you can choose and edit things one by one. Now click on next.
Step 6-
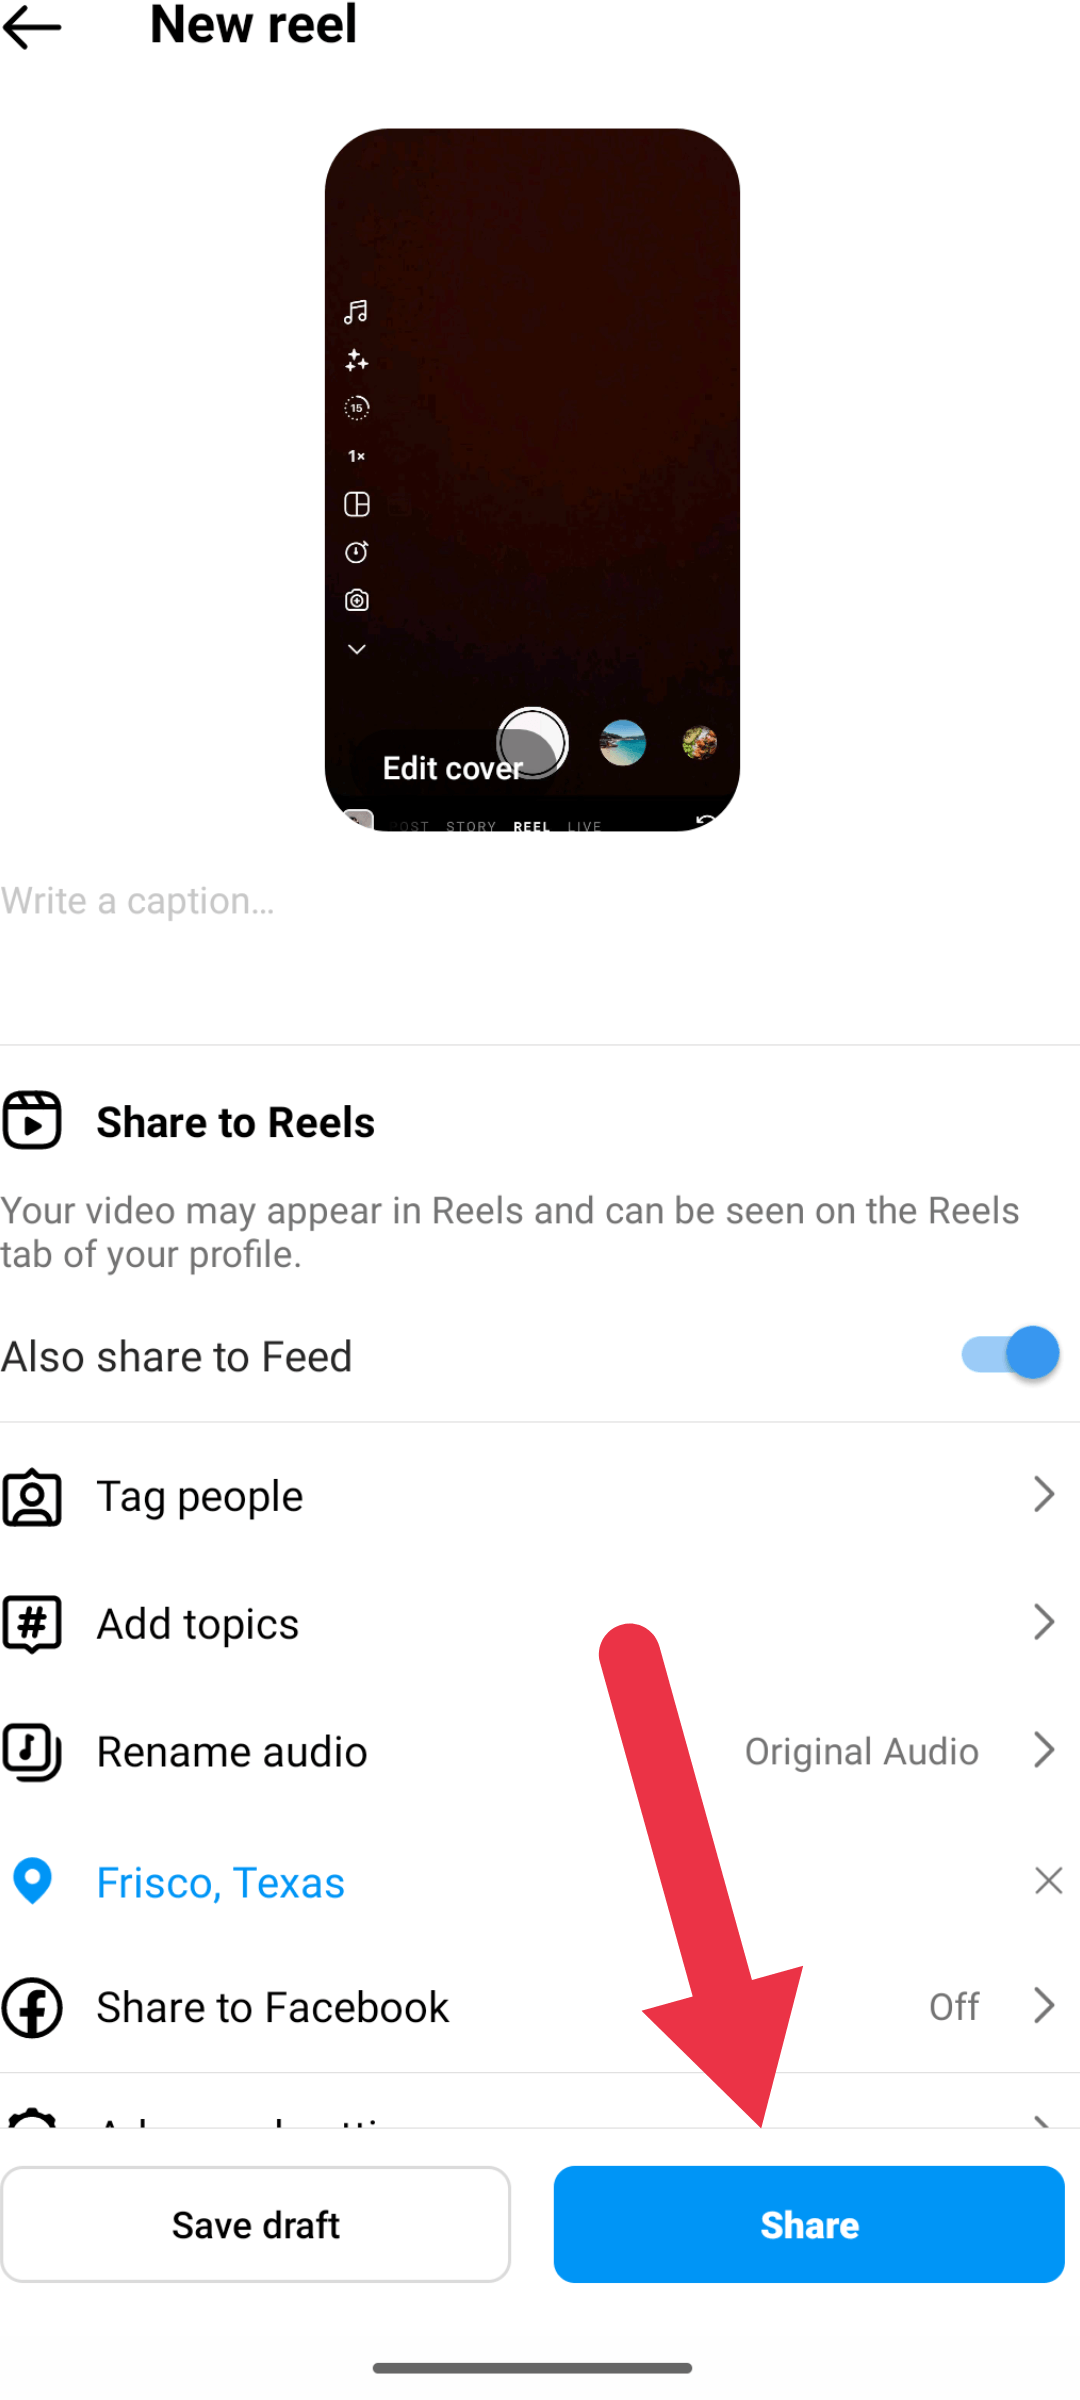
Tap the Share option at the bottom of the screen after making your configuration adjustments.
Congrats! Your first reel was posted.
What Are Some Tips To Make My Reel Viral?
Always remember, the hack to the Instagram algorithm is to try and use as many features as it has to offer. If you are successful in doing that consistently, the algorithm is yours. Here are our four top tips to make viral reels-
Use trending music and follow ongoing trends-
Trends emerge because people find them appealing and want to examine and engage with them repeatedly. The same is true of "trending" music. Choose what people will like. Pick a style of music that appeals to the general public at that moment. Please don't be lazy; give up the “I can save it and use it later” attitude. No, now is the time since the social media game, and particularly the trends for reels, are quite fleeting. You won't gain any traction if you create a video about an outdated trend. Therefore, keep a close eye on current events and create reels when they are hot enough to gain popularity.
Use appropriate hashtags-
On Instagram, hashtags are an essential component of all posts. This is so that users who could be interested in your video can be shown it by Instagram's algorithm, which they aid in understanding.
Utilizing hashtags improves searchability and expands the audience for your material on the platform.
Care must be used when selecting hashtags. Because there is more competition, the most well-liked ones are not usually the finest. To create a unique hashtag approach, mix things up.
Use a custom reel cover for each of your reel-
Always put a cover over your reel, which should be related to what you are trying to show in the reel. It does two things, firstly it looks visually appealing on your feed, secondly, it helps the audience to understand what the reel is about and interests them to click and view your reel.
Post consistently-
The secret is consistency. Consistently posting reels increases your chances of having one go viral. Though you shouldn't feel obligated to make one every day, do your best to do so as frequently as you can.
Give it some time, and in the meantime, keep adding new Reels.
What Is The Best Time To Post An Instagram Reel?
According to the stats from earthweb.com, users spend 30 minutes a day looking on Instagram, therefore you only have a limited amount of time to engage your audience. The ideal times to publish Reels are 9 AM and 12 PM, Monday through Thursday, according to Hootsuite.
See how they arrived to this conclusion here.
Analytics- How To Track The Topmost Important Metrics?
Everything you do in marketing is for naught if you are not monitoring the crucial metrics. There are 3 ways by which you can track these metrics.
Individual reels-
Simply go to the posted reel, click on the three dots at the very end (bottom right corner) and tap on “View insights”. Here you’ll be able to see all the important numbers like reach, engagement, and interactions- Likes, Comments, Shares and Saves.
Insights tab on Instagram-
Go to your Instagram profile and choose "Insights" to view the Reels' overall performance.
You may look through the various reels to check how they're doing in terms of boosting your account's growth and extending your reach.
Reels insights provide you with a detailed analysis of:
· Comments
· Likes
· Saves
· Reach
· Plays
· Shares
· Reels Interactions
Through Meta Business Suite-
Step 1-
Open your Facebook profile and open “Meta Business Suite” from the menu on the left.
Step 2-
Click on “Insights” from the menu on the left.
Step 3-
Click on the last option- “Content” from the menu on the left. Here you will get options to select a particular date range for analysis, and filters to apply for Facebook and Instagram posts and stories.
Step 4-
Select a particular date range and select “Instagram Posts” from the filters on the top right hand corner.
Step 5-
Click on export and you will find the complete breakup of the data for your reels (can be identified under “type”).
Wrap-up
Reels can make a big contribution to the growth of your company or personal brand. As a result, it is critical to take advantage of this functionality. And the best part is that it isn't all that difficult.
Maintain consistency in your approach and your specialization at all times. There is no way you will fail.
We hope we were able to answer your top Instagram reels questions.
